Archive for category: Knowledgebase
Can I stop dosage abbreviations from expanding when I am dictating with Dragon Medical Practice Edition?
Yes, you can disable the expansion of abbreviations such as “QHS” to “at bed time”. This can be useful when dictating into some EMR’s that require the code in a particular field. Below you can find the steps on disabling this feature.
Step 1 Open and Change the DMPE Formatting Settings
1. In the DragonBar, select Tools> Auto-Formatting Options as illustrated below.

2. Select the “Miscellaneous” tab.
3. Uncheck the “Expand dosage abbreviations” option and click Apply>OK option as illustrated below.

Congratulations! You are done! Now your dictations will not automatically expand dosage abbreviations. Kick the tires and give it a spin!
Verification Source: In-house testing
Test Date: 07-05-12
Does Dragon Medical Practice Edition support Google Chrome?
You can dictate into open text fields, scroll up/down and minimize/maximize windows but that’s about it. Within Google Chrome, DMPE doesn’t offer the full functionality of selecting links, and hands free navigation like that found in Internet Explorer and Firefox.
Verification Source: In-house testing
Test Date: 02-06-12
Can I encrypt custom commands within Dragon Medical Practice Edition v 11??
Yes! By using the "My Commands Protection" Utility within Dragon Medical Practice Edition you will have the ability to seamlessly encrypt custom commands. In the example we will take you step by step to export and encrypt a custom command that users can then import and apply the commands in any other profile. Users however will be unable to view the source code, edit the code or re-export the commands. Therefore you can be assured the integrity of the commands remains protected.
Step 1 Export the Unencrypted Custom Command
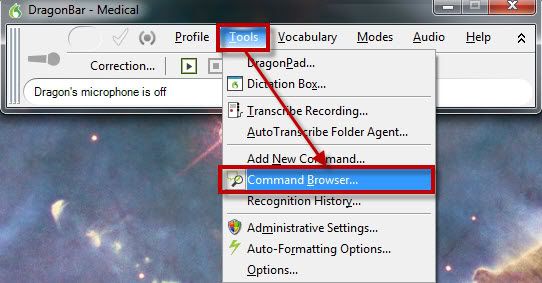
1. In the DragonBar, select Tools>Command Browser as illustrated below.
2. Select the desired custom command>Export illustrated below. Depending on where you save your custom commands this may be in a different folder. Note by choosing a simple location such as the root of C:\, it becomes simple for you to type the path location in the Mycommands Protection Utility tool.
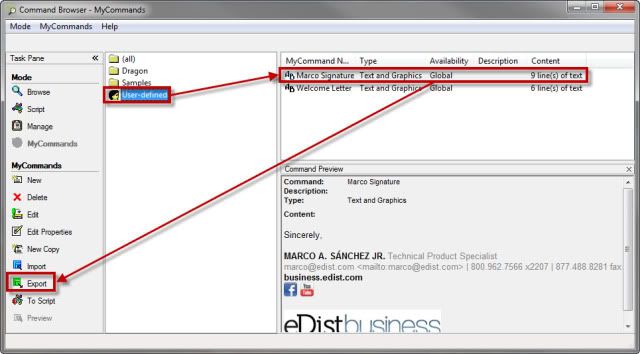
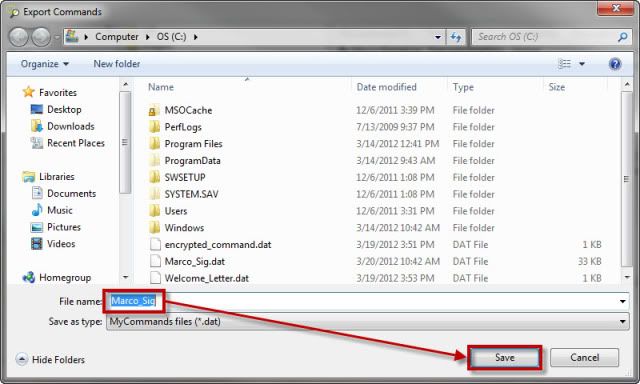
3. Name and Save the custom command illustrated below. Note you will want to backup the exported command prior to encryption for your records, as they will not be available for further edit.
Step 2 Encrypt the Exported Command
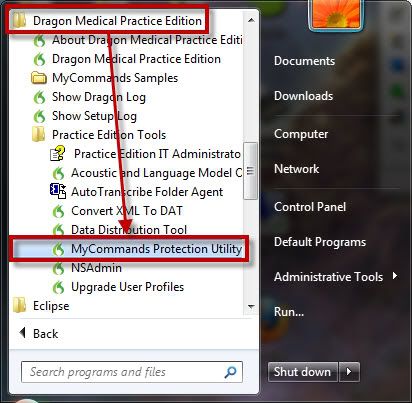
1. In the Start Menu, select Dragon Medical Practice Edition>Practice Edition Tools>MyCommands Protection Utility as illustrated below.
2. In the MyCommands Protection Utility, type the encryption command and desired variables by hitting the Enter key illustrated below. In this example I used: protectcmds.exe C:Marco_Sig.dat eDist [[email protected]]
Note you may use double quotes if there are any spaces in the path/file name, vendor –name or vendor-contact-info fields.
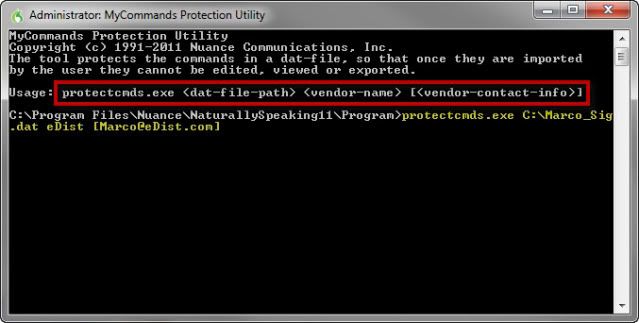
3. If you have used the correct format, the confirmation "Protected 1 Commands in "C:Marco_Sig.dat "." in the MyCommands Protection Utility window can be seen and you can exit as illustrated below..

STEP 3 Import the Encrypted Commands
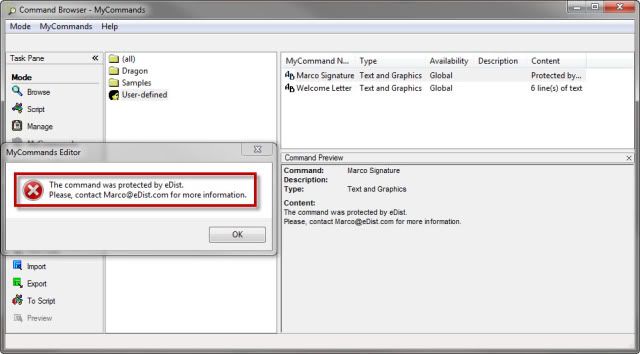
At this point you may now import the protected commands into any user’s profile. While they will be able to use the commands, if they try to view or edit the command, they will receive the following message.
Important: Be careful not to import it into the user profile from which you created the commands, or you’ll overwrite the encrypted ones.
Congratulations! You did it! Your commands will now be encrypted. Go ahead give it another try, this time without the training wheels!
Verification Source: In-house testing
Test Date: 03-20-12
How do I customize the training text within Dragon Medical Practice Edition?
In Dragon® NaturallySpeaking v11.5 & Dragon Medical Practice Edition, you have the ability to customize the enrollment process; the benefits of customizing the text is that it allows you more flexibility in determining content, it helps promote your companies qualities and simplifies the enrollment process. This guide will show you how to customize the training text. Illustrated screen shots have been added for your convenience.
STEP 1: Create Customized Text
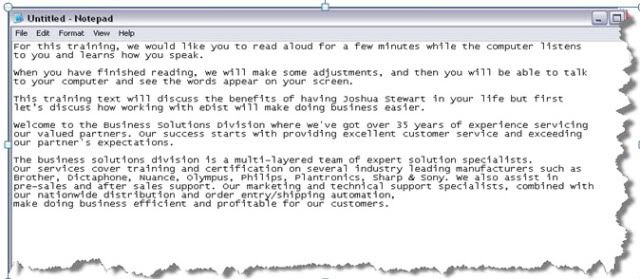
1. Open Notepad and create the document you wish to use as the training text in Dragon. The text should be approximately 1700 words. Be sure to keep all text viewable on the screen and be sure to separate each paragraph with a space.
STEP 2: Save the Training Text
Once you’re created or decided which text you want to use for Dragon training, you’ll need to save it properly. For this step, we will save this document in two different locations as two different file types.
NOTE: You will have to unhide protected operating system files in order to view the necessary directories. This can be done through your Control Panel > Folder Options > View.
IMPORTANT: Please do not attempt this customization unless you’re an advanced computer user. If done incorrectly, you have the chance of crashing your computer.
1. Within Notepad, go to File > Save As.
A Save As dialog window will appear. For this location, we will save this document in the following directories:
[Windows XP] C:\Documents & Settings\All Users\Application Data\Nuance\NaturallySpeaking10\Data\Training\Enx
[Windows Vista & 7] C:\Users\All Users\Nuance\NautrallySpeaking11\Data\Training\Enx
File Name: Save the file with a similar name to the other enrollment files. I recommend naming it [data77.bin].
Save as Type: Select [All Files] | Encoding: Select [ANSI]
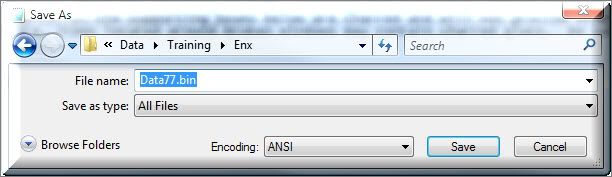
2. Click [Save]
You will be brought back to your Notepad document. Now we will save it to our desktop.
3. Go to File > Save As. A Save As window will appear. This time, save the document to your desktop.
File Name: You can keep the same file name. In our case, it was [data77]
Save As Type: Select [Text Documents (*.txt)] | Encoding: Select [ANSI ]
STEP 3: Scan Document using Accuracy Center
1. Open Dragon and go to Help > Improve my Accuracy.
2. Once the Accuracy Center opens, select [Learn from specific documents]. This will open the Add Word from Documents wizard, select [Next].
3. You will be prompted to Add Documents. Select [Add Document] to browse your Desktop for the Data77.txt file you just saved in step 2.

4. When the Document Analysis window appears, click [Next] to continue with the scanning process.
5. Continue selecting [Next] until the process is complete.
NOTE: If Dragon finds any words that it’s unfamiliar with, it will ask you to train the words. I would recommend training the terms. This will ensure that Dragon knows the pronunciation of the words during the training process.
STEP 4: Edit BIN Directory
We will need to edit the directory in Dragon so that it will include our story as an option for available training text.
1. On your computer, navigate to:
[Windows XP] C:\Documents & Settings\All Users\Application Data\Nuance \NaturallySpeaking10\Data\Training\Enx
[Windows Vista & 7] C:\Users\All Users\Nuance\NautrallySpeaking11\Data\Training\Enx
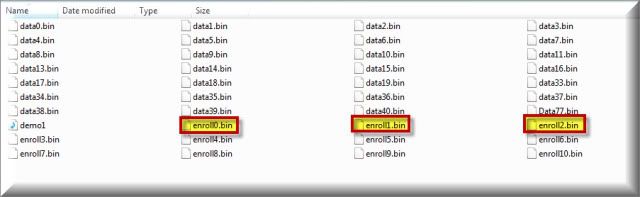
2. Here you will see a full list of the available training options available in Dragon. You should now see your [Data77.bin] file in this list.
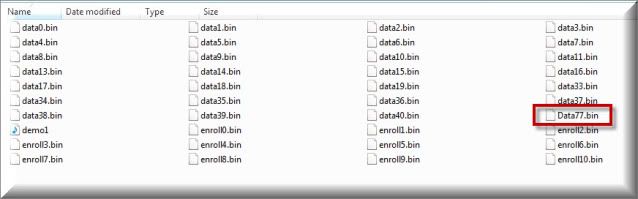
3. Once confirmed, we will focus on the following three files:
- Enroll0.bin (This contains the list of available training scripts for the initial enrollment)
- Enroll1.bin (This contains the list of available training scripts for the additional training option)
- Enroll2.bin (This contains the list of available training scripts for Recorder training)
4. Choose which list of scripts you want to customize and open that script in Notepad. Once open, add the Title and bin information about your training text to the list and save.
For this guide, I will use the following: eDist – Doing Business Just Got Easier (Medium Reading: General)
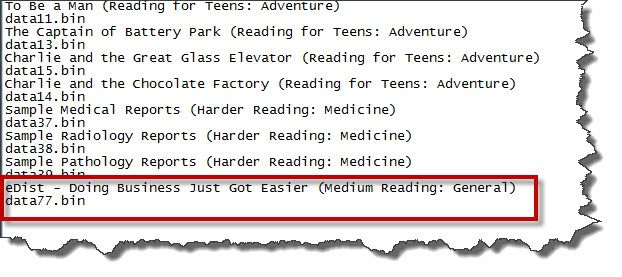
5. Once you have edited the proper enroll bin file, click [Save] > [Exit].
6. Open Dragon, go to Help > Improve my Accuracy. Once the Accuracy Center opens, select [Read text to train Dragon to your voice]. There, you will find your custom training script available on the list.

Congratulations, you’re done!
Verification Source: In-house testing
Test Date: 2.3.12
Program the Dictaphone PowerMic II to perform a custom command while in the Dictation Box for Dragon Medical Practice Edition.
You can program the Dictaphone PowerMic II to perform a User Defined Command such as inserting text or a signature specifically for the Dictation Box in Dragon Medical. In this example, we are going to customize the Custom Right Button of the PowerMic II. This can be done by following the below steps.
Step 1 Open the PowerMic II Options
1. On the Dragon Bar, click on Tools>Options.
2. Select the Dictaphone PowerMic II tab.

Step 2 Select the DictationBox Options
1. Click on the Application drop down box.
2. Select the DictationBox entry from the drop down box.

Step 3 Assign the Custom Right Button
1. Click on the “Custom Right” button (illustrated below in green hilghlight) drop down box.
2. Hover Mouse over the “User Commands” selection.
3. Select the desired user defined command.

Step 4 Apply and Save the Changes
1. Click the “Apply’ and then “Save” buttons.
Congratulations! Your are done! Now you have the Custom Right Button on the Dictaphone PowerMic II assigned to a custom command. Open the DictationBox and test your newly assigned button.
Verification Source: In-house testing
Test Date: 01-19-12
How can I obtain the Dragon Log within Windows XP and Windows Vista/Windows 7?
You can find the Dragon Log location within Windows XP and Windows Vista/Windows 7 by following either of the two methods outlined below.
Method A
In the Windows menu, click on Start > All Programs > Dragon Medical Practice Edition > Show Dragon Log.
Method B
If the Dragon Medical Practice Edition Log is not available from that location, go to the following folder, assuming Dragon Medical Practice Edition is installed on your C drive.
Windows XP: C:\Documents and Settings\<username>\Application Data\Nuance\NaturallySpeaking11
Windows Vista/Windows 7: C:\Users\<username>\AppData\Roaming\Nuance\NaturallySpeaking11
***Note that your Windows Explorer Folder Options view must be set to show hidden files and folders.
Verification Source: In-house testing, Dragon Help Menu
Test Date: 02-09-12
How to create an Advanced Scripting macro (aka custom command) to automatically launch a Microsoft Template?
Within Dragon NaturallySpeaking & Dragon Medical Practice Edition, there are several advantages of using Advanced Scripting to launch your templates. To start, this method allows you to call up templates that are already created rather than having to create separate Text & Graphic macro’s for each template. Also, this method allows you to take advantage of the advanced features and functionality offered through your advanced word processing applications (i.e. Microsoft Word).
Advanced Scripting allows you to create complex scripts and sequences to perform virtually any function on the computer using voice commands. Creating Advanced Scripting commands within Dragon NaturallySpeaking & Dragon Medical Practice Edition requires familiarity with the Microsoft Visual Basic programming language.
This illustrated how to guide will walk you through the process of creating an Advance Scripting command to call up your existing Windows Templates.
STEP 1: Locate the default Windows Template Directory
When you create & save a template, it is generally stored in a default location on your computer. You’ll need to find this location and make sure the templates you want to launch are saved there. Once you find the default location, write down the names of the Templates you will be working with.
On a computer running Windows 7, this location is:
C: /Users/<username>/AppData/Roaming/Microsoft/Templates

STEP 2: Create an Advanced Scripting Macro to launch these templates
1. Open Dragon NaturallySpeaking or Dragon Medical Practice Edition
2. Open the MyCommands Editor by going the DragonBar, then Tools > Add NewCommand.

3. The MyCommands Editor window will open. Choose a name for your command and enter it in the [MyCommand Name] field. For this guide, I will name it: “open <name_of_template>”
NOTE: When you insert single angle brackets (<>) into the MyCommand Name field, a separate MyCommands Name Editor dialog box will appear.

4. Once the name has been entered, it will appear in the new MyCommands Name Editor window. Highlight the command name (name_of_template) and select [Edit].

5. A View List dialog window will appear. Under the [List Contents] section, enter the names of your templates copied from Step 1. Then click [OK]

6. You will be returned to the MyCommands Name Editor window, select [OK].
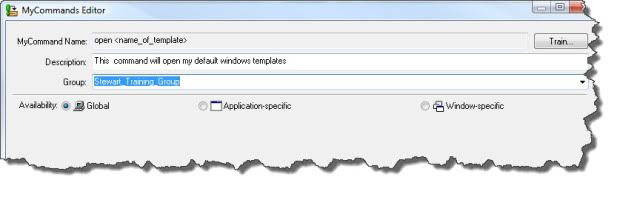
7. You will now be returned to the main MyCommands Editor window, enter a Description to help you identify the command.
8. Specify a Group. In the [Group] field, specify whether this command will be a Dragon command or a user-defined command. If it is user-defined, you can type over “user-defined” with a group name of your choice. The new group name will appear in the list the next time you create a command. Putting macros in a group will make them easier to find and manage within the command browser.
9. Change the Command Type. Open the list box next to Command Type and choose [Advanced Scripting].
Note: When Advanced Scripting is select the content window will change to a script window.
10. Enter the following visual basic script into the Script window.

11. Set Object Reference Library. Right-click in your script window and select [References].

12. A References – MyCommand window will appear. This list will show you the available references. Choose the advanced word processing application that you’ll be using. For this guide, I am using Microsoft Office Word 2010, therefore; I’ll select [Microsoft Word 14.0 Object Library (8.5)]

13. Click [OK].
14. You will be brought back to the main MyCommands Editor window, select [Save].
Note: If you receive a syntax error, you’ve entered the code incorrectly.
Congratulations, you’ve just created an Advanced Scripting Macro that will allow you verbally launch your windows templates.
For example: “Open Visit Note”
Verification Source: In house testing
Test Date: 10.4.11
Will my older Philips SpeechMike 5274 work with the new Dragon Medical Practice Edition?
Yes, you can use an older Philips SpeechMike II with the New Dragon Medical Practice Edition. Make sure that you’re running the latest version of the Philips Device Control Center (v2.8 build 260). Otherwise, the microphone will automatically turn off when being used.
Click Here to download the Philips Device Control Center v2.8 Build 260
Verification Source: In house testing
Test Date: 10.3.11
Where can I find the Dragon Client for Remote Desktop?
The Dragon Client For Remote Desktop can be found in a top-level folder on the Dragon Medical Practice Edition DVD. The installation consists of three components that you install on the client computer:
- Audio Setup Wizard: a stand-alone application that provides a way to check that your microphone sound levels and signal quality are suitable for using Dragon Medical Practice Edition with a remote desktop connection.
- PMIIControl.exe – the Powermic II Button Control application: a stand-alone application that provides a way to customize the buttons on the PowerMic II. The buttons can be used with Dragon Medical Practice Edition while working across the remote desktop connection, and can also be used with local applications, independent of installing and using Dragon Medical Practice Edition.
- Sample VBS Script: to automatically launch the ASW/Remote Desktop Connection. You can modify the script to customize the directory for the client’s computer.
Verification Source: Dragon Medical Practice Edition Administrators IT Guide
Testing Date: 10.25.11
12